In the previous section, we demonstrated how to create a session that returns a Session ID.
This Session ID is then used to build a service URL that launches the Yoti web client. The generated URL can be used in several ways:
On-demand session creation via a button click
Embedded within an iFrame on your webpage
Integrated using a WebView in your mobile app
Displayed as an encoded QR code
Hint: This is only intended for sessions where the user interface needs to be launched.
https://age.yoti.com?sessionId=<sessionId>&sdkId=<sdkId>
URL Parameter | Description |
|---|
sessionId | The ID returned in the response when you create a Yoti AVS session. |
sdkId | The SDK ID for your application, obtained from the Yoti Hub. |
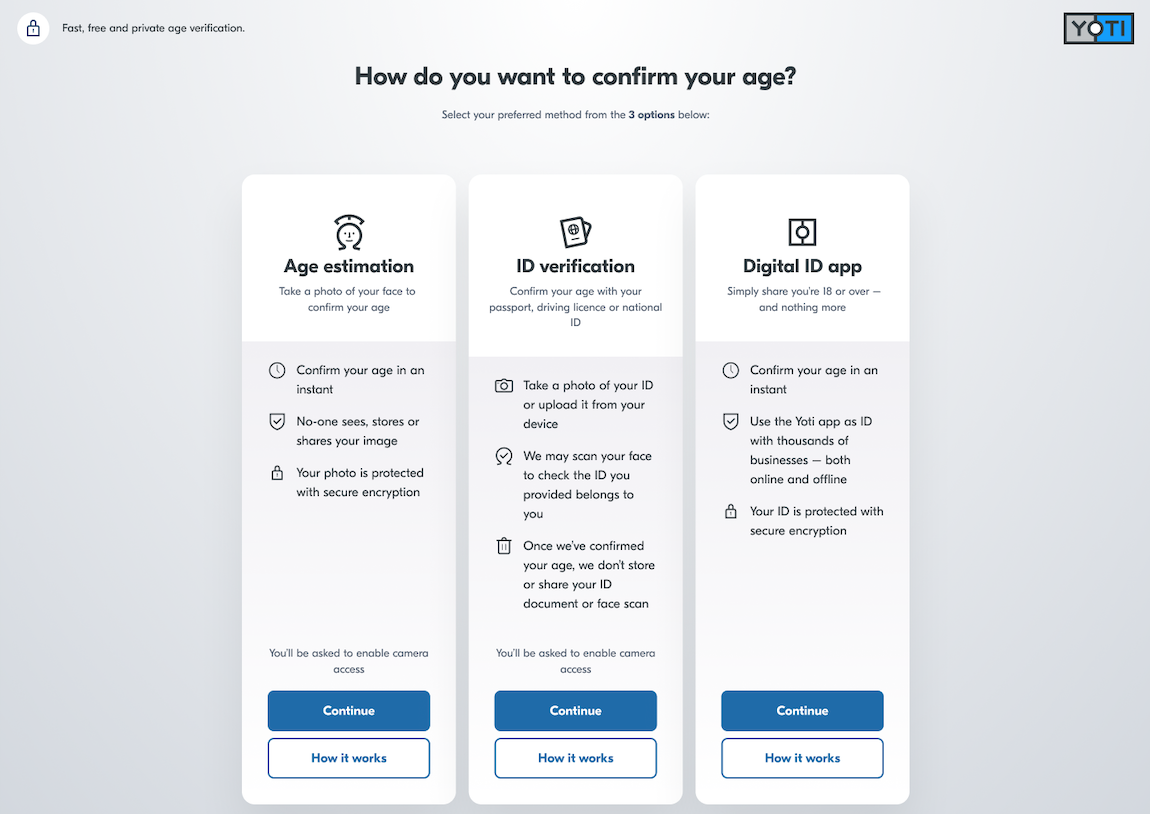
Once the Yoti web client is launched, it guides the user through the age verification flow. Upon successful completion of one of the age verification methods, the user will be seamlessly redirected to the designated callback URL.
User View
On-demand session creation
You can easily render a button on your webpage that allows users to request on-demand age verification sessions.
To do this, you'll need to implement client-side JavaScript to manage the button click event. When a user clicks the button, it should initiate an API request to your backend server, which is responsible for creating a new age verification session.
<button id="yoti-verify-btn">Verify Age with Yoti</button>
<script>
document.getElementById('yoti-verify-btn').addEventListener('click', async function() {
const button = this;
try {
// Call YOUR backend endpoint to create the Yoti session
// Do NOT put Yoti API Key or SDK ID in this frontend code.
const response = await fetch('/api/create-yoti-session', {
method: 'POST',
headers: {
'Content-Type': 'application/json'
},
body: JSON.stringify({ userId: '12345' })
});
const data = await response.json();
// Redirect the user to the Yoti verification URL provided by your backend
if (data.sessionUrl) {
window.location.href = data.sessionUrl;
}
} catch (error) {
// error handling
}
});
</script>
In your backend server, you will need to prepare an endpoint (e.g., /api/create-yoti-session in the above example). When the frontend calls this endpoint, your backend should create a new session. Upon successful creation, your backend server should return the service URL. Your frontend UI can then redirect the user to it, providing a seamless experience for age verification.
Iframe implementation
The example below demonstrates the use of an iframe:
<iframe src="https://age.yoti.com?sessionId=<sessionId>&sdkId=<sdkId>" width="800" height="700" allow="camera" allow="publickey-credentials-get; publickey-credentials-create;" rel="noreferrer"></iframe>
Please note: allow="camera" is required when the age estimation or document scan methods are used.
Good to know
While it is possible to use this solution in an iFrame, using a new browser window will guarantee an optimal user experience.
WebView implementation
The examples below show how to use the session within a WebView for mobile apps:
let config = WKWebViewConfiguration()
config.allowsInlineMediaPlayback = true
// Allow autoplay / not requiring user gesture (iOS 10+)
config.mediaTypesRequiringUserActionForPlayback = []
let webView = WKWebView(frame: .zero, configuration: config)
let url = URL(string: "https://age.yoti.com?sessionId=<sessionId>&sdkId=<sdkId>")
webView.load(URLRequest(url: url))
class MainActivity : ComponentActivity() {
private var permissionRequest: PermissionRequest? = null
private val requestPermissionLauncher =
registerForActivityResult(ActivityResultContracts.RequestPermission()) { isGranted: Boolean ->
if (isGranted) {
permissionRequest?.grant(permissionRequest?.resources)
} else {
permissionRequest?.deny()
}
}
override fun onCreate() {
setContent {
AndroidView(
factory = { context ->
WebView(context).apply {
settings.javaScriptEnabled = true
webViewClient = WebViewClient()
webChromeClient = object : WebChromeClient() {
override fun onPermissionRequest(request: PermissionRequest?) {
this@MainActivity.permissionRequest = request
val requestedResources = request?.resources
requestedResources?.forEach { resource ->
if (resource == PermissionRequest.RESOURCE_VIDEO_CAPTURE) {
when {
ContextCompat.checkSelfPermission(this@MainActivity, Manifest.permission.CAMERA) == PackageManager.PERMISSION_GRANTED -> {
request.grant(request.resources)
}
else -> {requestPermissionLauncher.launch(Manifest.permission.CAMERA)}}}}}}
loadUrl("https://age.yoti.com?sessionId=<sessionId>&sdkId=<sdkId>")}},)}}}
<View style={{ flex: 1 }}>
<WebView
source={{ uri: "https://age.yoti.com?sessionId=<sessionId>&sdkId=<sdkId>" }}
style={{ flex: 1 }}
allowsInlineMediaPlayback={true}
mediaPlaybackRequiresUserAction={false} />
</View>
Note: Enabling inline media playback is necessary to allow the phone’s camera to open within the WebView, rather than in full-screen mode.
Specific permissions must also be enabled to allow camera access and provide an optimal experience.
<key>NSCameraUsageDescription</key>
<string>We need access to your camera to let you take photos and record video.</string>
<!-- Internet permission is required to prevent the URL being opened in an external browser --><uses-permission android:name="android.permission.INTERNET"/>
<uses-permission android:name="android.permission.CAMERA" />
QR code display
A QR code provides an alternative method for launching the Yoti AVS session. You can encode the session URL as a QR code and display it on a screen for users to scan with their mobile devices, which opens the web client in their browser. This allows customers to complete age verification securely on their own devices.
Before displaying the QR code, you should implement authentication to ensure the user is logged in or otherwise uniquely identified. In addition, you can also use the reference_id field in the Session payload to associate the AVS session with your unique user ID. This helps you track the session and tie results back to the correct user.
Alternatively, you can proxy the Yoti AVS Session URL behind your own service, allowing you to attach an auth cookie or token. This approach reduces the risk of the Session URL being forwarded or reused by someone else.
Important: Remember to subscribe to webhook notifications and track session results to update the user journey on the main screen as appropriate.
Below are some example code snippets. You may also use other libraries to generate the QR code.
const QRCode = require('qrcode');
const url = 'https://age.yoti.com?sessionId=<sessionId>&sdkId=<sdkId>';
QRCode.toDataURL(url, (err, url) => {
console.log(url); // Outputs: data:image/png;base64...
});
import { QRCodeSVG } from 'qrcode.react';
function App() {
return (
<div style={{ padding: '20px' }}>
<QRCodeSVG value="https://age.yoti.com?sessionId=<sessionId>&sdkId=<sdkId>" size={256} includeMargin={true} />
</div>
);
}
import qrcode
import io
import base64
img = qrcode.make("https://age.yoti.com?sessionId=<sessionId>&sdkId=<sdkId>")
buf = io.BytesIO()
img.save(buf, format='PNG')
img_str = base64.b64encode(buf.getvalue()).decode('utf-8')
print(f"data:image/png;base64,{img_str}")
import com.google.zxing.qrcode.QRCodeWriter;
QRCodeWriter barcodeWriter = new QRCodeWriter();
BitMatrix bitMatrix = barcodeWriter.encode("https://age.yoti.com?sessionId=<sessionId>&sdkId=<sdkId>", BarcodeFormat.QR_CODE, 350, 350);
ByteArrayOutputStream stream = new ByteArrayOutputStream();
MatrixToImageWriter.writeToStream(bitMatrix, "PNG", stream);
String base64Image = Base64.getEncoder().encodeToString(stream.toByteArray());
use Endroid\QrCode\Builder\Builder;
$result = Builder::create()->data('https://age.yoti.com?sessionId=<sessionId>&sdkId=<sdkId>')->build();
echo $result->getDataUri(); // Directly usable in <img src="...">
var png []byte
png, _ = qrcode.Encode("https://age.yoti.com?sessionId=<sessionId>&sdkId=<sdkId>", qrcode.Medium, 256)
encoded := base64.StdEncoding.EncodeToString(png)
fmt.Printf("data:image/png;base64,%s", encoded)
using (QRCodeGenerator qrGenerator = new QRCodeGenerator())
using (QRCodeData qrCodeData = qrGenerator.CreateQrCode("https://age.yoti.com?sessionId=<sessionId>&sdkId=<sdkId>", QRCodeGenerator.ECCLevel.Q))
using (PngByteQRCode qrCode = new PngByteQRCode(qrCodeData))
{
byte[] qrCodeAsPngByteArr = qrCode.GetGraphic(20);
string base64 = Convert.ToBase64String(qrCodeAsPngByteArr);
string dataUri = $"data:image/png;base64,{base64}";
}