This is your online library of information about onboarding with Yoti.
FAQs
Read of our most commonly asked questions from integrators and businesses.
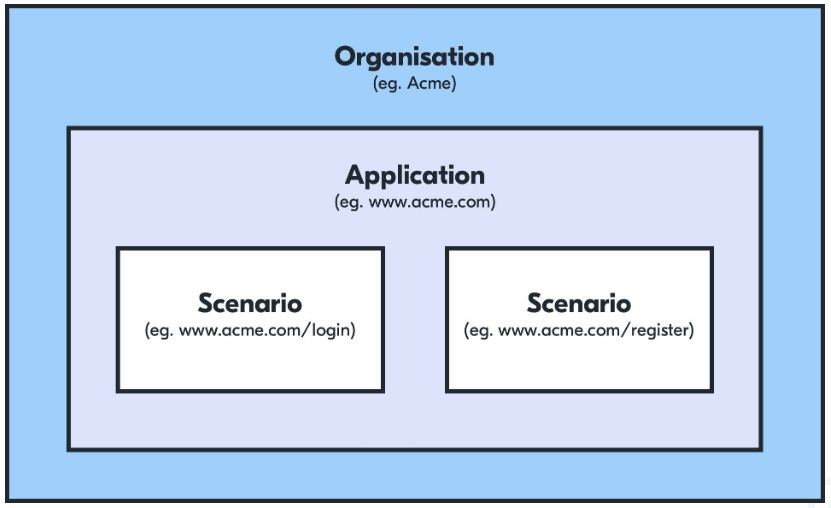
Application hierarchy
Your application will be structured as follows:
Organisation > Applications > Scenarios
- You can create multiple applications within your organisation, each application refers to a domain and has its own users.
- Within each application you can create multiple scenarios for each of your use cases. These can be set up to request different attributes from your users and will direct the user to a chosen page within your domain.
Application hierarchy
Yoti attributes explained
This section describes all the attributes Yoti supports in more detail. There is a small explanation of each attribute and what the content type is.
General attributes
| Name | Content Type | Explanation |
|---|---|---|
| date_of_birth | DATE | Date of birth of the user. |
| email_address | STRING | The user's verified email address. |
| family_name | STRING | Corresponds to primary name on a passport, and surname in English. |
| full_name | STRING | The user's full name. If family_name/given_names are present, this will be equal to the string ${given_names} + " " + ${family_name}. |
| gender | STRING | Corresponds to the gender in the registered document; will be one of the strings "MALE", "FEMALE", "TRANSGENDER" or "OTHER". |
| given_names | STRING | Corresponds to secondary names on a passport, and first/middle names in English. |
| nationality | STRING | Corresponds to the nationality on the passport. ISO-3166-1 alpha-3 code with ICAO9303 (passport) extensions. See Wikipedia page for ISO-3166-1 alpha-3 codes, and see ICAO 9303 part 3 (section 5 part A) for the extended list of codes. |
| phone_number | STRING | The user's phone number, as verified during registration. This will be a number in E.164 format (i.e. + for international prefix and no spaces, e.g. "+447777123456"). |
| photo | JPEG | Photograph of user, encoded as a JPEG image. |
| age_over:[1-999] | STRING | Whether the user is over the specified age, as calculated from their date of birth. Either "true" or "false". |
Optional / Additional attributes
If you do not require an attribute as a mandatory request, you can mark an attribute as optional. Please follow the instructions below:
1) Log on to the Yoti Hub
2) Go to Your application > Your scenario
3) The URL should look like this: https://hub.yoti.com/organisations/[org_id]/applications/[app_id]/scenarios/[scenario_id]/edit. To activate the advanced policy mode append /advanced to this url.
4) Find the attributes you want to make optional for your users and mark as true.
xxxxxxxxxx{name: 'date_of_birth', anchors: [], derivation: '', optional: true,accept_self_asserted: false, alternative_names: [] },Additional attributes that can request from users:
| Name | Expected content type | Description |
|---|---|---|
| document_details | STRING |
|
| document_images | MULTI_VALUE | Contains a jpeg image of the document. |
Address attributes explained
Yoti has two options to show clients addresses:
1) Full address:- the address as a string.
2) Structured address:- a broken down version of an address.
There is a small explanation of each attribute and what the content type is.
| Name | Expected content type | Explanation |
|---|---|---|
| building_number | STRING | The number of the building. |
| building_name | STRING | The name of the building. |
| sub_building_name | STRING | The subtitle of the building. |
| address_line_1 | STRING | The first line of the address. |
| address_line_2 | STRING | The second line of the address. |
| address_line_3 | STRING | The third line of the address. |
| town | STRING | The town of the address. |
| country | STRING | The country of the address. |
| postal_code | STRING | The postcode for the address. |
| postal_address | STRING | The full address. |
| structured_postal_address | JSON | The full address in both machine readable form and human readable form |
The below defines the fields of a JSON structure that can be used to define any address. A subset of fields will be present in each case and address_format can be used to ascertain which ones for any given address. The country iso should not be used for this purpose.
We have four formats shown below:
| Field | Format 1 (UK) | Format 2 (INDIA) | Format 3 (USA) | Format 4 (ROW) |
|---|---|---|---|---|
| udprn | Optional | |||
| care_of | Optional | |||
| sub_building | Optional | |||
| building_number | Optional | |||
| building | Optional | Optional | ||
| street | Optional | |||
| landmart | Optional | |||
| address_line_1 | Present | Present | Present | |
| address_line_2 | Optional | Optional | Optional | |
| address_line_3 | Optional | Optional | ||
| address_line_4 | Optional | |||
| address_linen | Optional | |||
| locality | Present | Optional | Present | |
| town_city | Optional | |||
| subdistrict | Optional | |||
| district | Optional | |||
| state | Optional | Optional | Present | Optional |
| postal_code | Present | Present | Present | |
| post_office | Optional | |||
| country_iso | Present | Present | Present | Present |
| country | Present | Present | Present | Present |
| formatted_address | Present | Present | Present | Present |
Format 1 Address attribute
The UK address format is as shown below with an example:
xxxxxxxxxx{ "address_format": 1, "building_number": "15a", "address_line1": "15a North Street", "town_city": "CARSHALTON", "postal_code": "SM5 2HW", "country_iso": "GBR" "country": "UK", "formatted_address": "15a North Street\nCARSHALTON\nSM5 2HW\nUK"}Format 2 Address attribute
The India address format is as shown below with an example:
xxxxxxxxxx{ "address_format": 2, "care_of": "S/O: Vipen Kumar Aggarwal", "building": "House No.86-A", "street": "Rajguru Nagar", "town_city": "Rajguru Nagar", "subdistrict": "Ludhiana", "district": "Ludhiana", "state": "Punjab", "postal_code": "141012", "post_office": "Rajguru Nagar", "country_iso": "IND", "country": "India", "formatted_address": "S/O: Vipen Kumar Aggarwal\nHouse No.86-A\nRajguru Nagar\nLudhiana\nPunjab\n141012\nIndia"}Format 3 Address attribute
The US address format is as shown below with an example:
xxxxxxxxxx{ "address_format": 3, "address_line1": "1512 Ferry Street", "town_city": "Anniston", "state": "AL", "postal_code": "36201", "country_iso": "USA", "country": "USA", "formatted_address": "1512 Ferry Street\nAnniston AL 36201\nUSA"}Source and verifiers
Within the SDKs and in our Yoti Hub you can see the sources and verifiers of each of the attributes the user has shared with your company.
Below represents an explanation of what is shown through our SDKs.
Sources
| Value | Description | Possible subtypes |
|---|---|---|
| USER_PROVIDED | Indicates that this attribute value was self-asserted by the user, with no supporting document as proof. | DAY_MONTH |
| PASSPORT | Indicates that this attribute value was extracted from a passport. The two subtypes available are via:- OCR or NFC. | OCR, NFC |
| DRIVING_LICENCE | Indicates that this attribute value was extracted from a driving licence. | N/A |
| NATIONAL_ID | The attribute was extracted from a National ID card / document | AADHAAR, STATE_ID, MYKAD |
| PASS_CARD | The attribute was extracted from a PASS card/document. | CITIZENCARD |
Verifiers
| Value | Description |
|---|---|
| YOTI_ADMIN | Indicates that this attribute value has been manually checked by staff at the Yoti security centre. |
| YOTI_IDENTITY | Indicates that the attribute value has been verified with a recognised identity database, or otherwise known as an Identity Verifier (IDV). |
| YOTI_OTP | The attribute has been verified by sending a generated one time passcode to it and checking it has been received |
| PASSPORT_NFC_SIGNATURE | The attribute was verified by its passport NFC signature |
| YOTI_UIDAI | Indicates that the attribute value has been verified with the Indian UIDAI system. |
| ISSUING_AUTHORITY | The attribute has been verified with a recognised document database |
| ISSUING_AUTHORITY_PKI | The signature that signed over the value on the original document has been verified with the relevant certificate authority |
On the Yoti app, the document the user adds last will default to be the source of the attributes shared. If you wish to ensure your attributes have come from a specific source please follow the below instructions:
1) Log on to the Yoti Hub
2) Navigate to your application created.
3) Navigate to your scenario name and click on this.
4) The URL should look like this: https://hub.yoti.com/organisations/[org_id]/applications/[app_id]/scenarios/[scenario_id]/edit. To activate the advanced policy mode append /advanced to this url.
5) Find the attributes you want with a source constraint and add an anchor source. See below for an example with a full name and date of birth.
xxxxxxxxxx{ constraints: [ { type: 'SOURCE', preferred_sources: { anchors: [ { name: 'PASSPORT', sub_type: '' } ], soft_preference: false } } ], name: 'date_of_birth', anchors: [], derivation: '', optional: false, accept_self_asserted: false, alternative_names: [] }, { constraints: [ { type: 'SOURCE', preferred_sources: { anchors: [ { name: 'PASSPORT', sub_type: '' } ], soft_preference: false } } ], name: 'full_name', anchors: [], derivation: '', optional: false, accept_self_asserted: false, alternative_names: [] }Customer receipts
Whenever details are shared through Yoti, each party involved immediately receives a record of the activity: who they shared with, what was shared, and the date / time the information was shared.
You will see the receipts of your applications in the receipts tab ordered by date. You will need to have your phone connected to Yoti Hub in order to view receipts.
No one at Yoti can never see your receipts - they are encrypted and we have no access to the key needed to decrypt the receipts. Only you do.
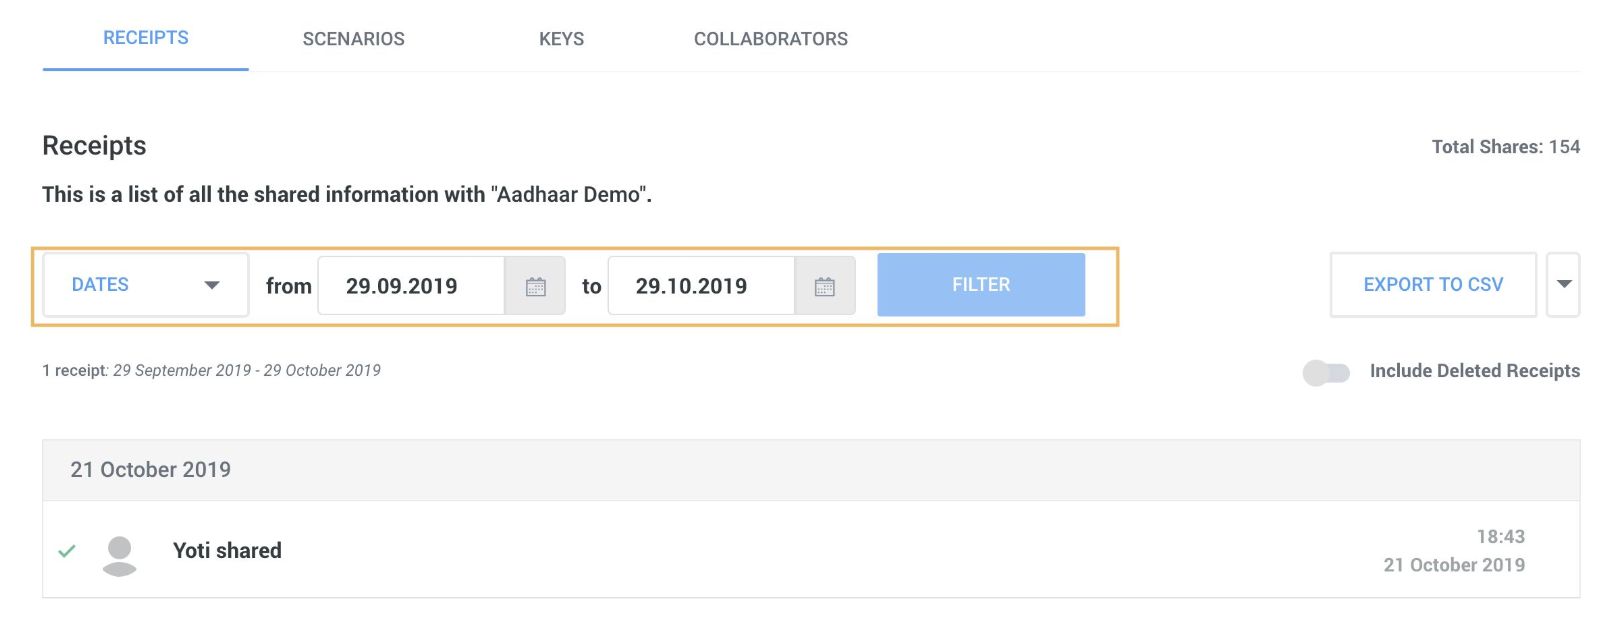
Download, filter, delete receipts
To download the receipts there is an Export to CSV button - this will download all of the receipts in the selected time period. By default, we display receipts from the last month.

Applications > Receipts
To filter receipts, you can use our date filter. This will display the receipts from this time period.
Applications > Receipts
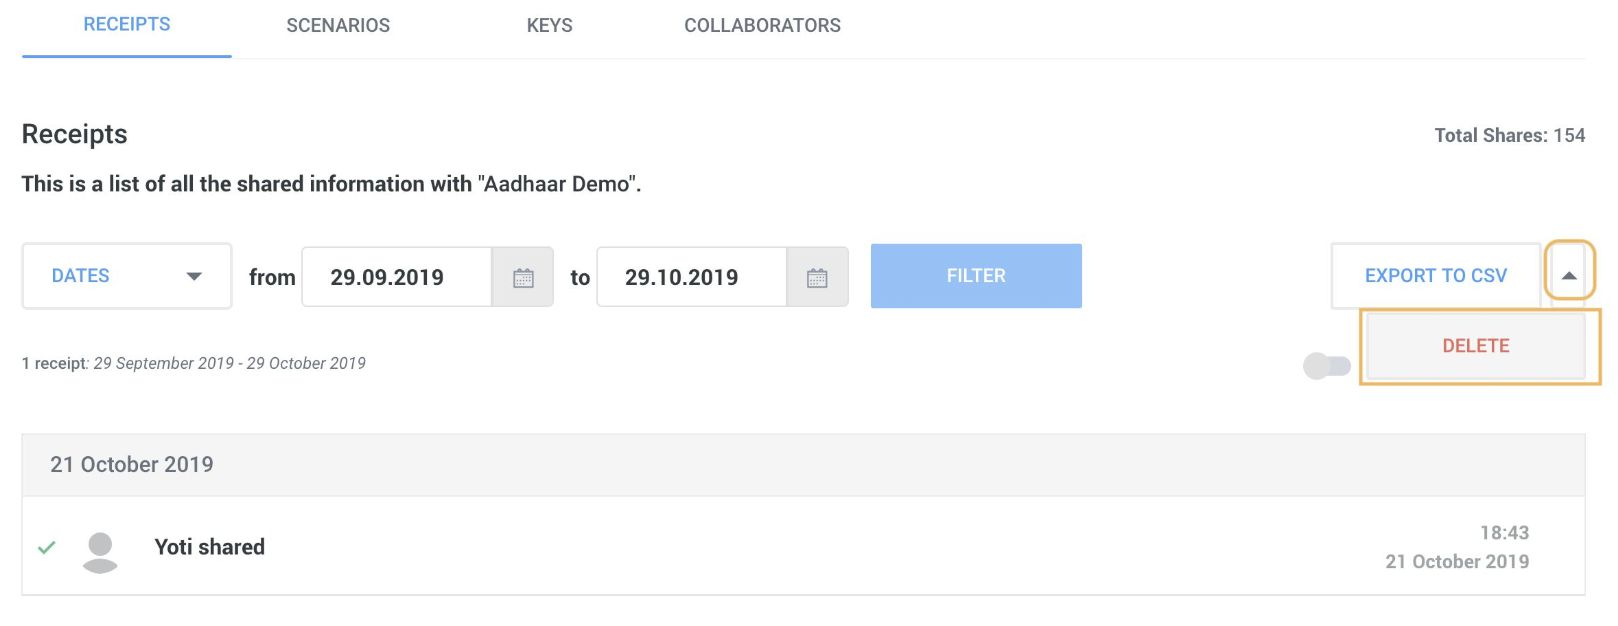
You can delete receipts for a certain time period or for a certain user.
To delete receipts by time period, filter the list based on the date range that you want to remove and click the Delete button in the dropdown menu next to Export to CSV.
Applications > Receipts
Source and verifiers in receipts
To view further information about how Yoti has verified the user's details, you can click on the Show sources and verifiers tick box at the top of an individual receipt.

Applications > Receipts > Click Receipts > Show sources and verifiers
Settings
The Settings page allows you to view your organisation details, update your billing information and add a payment card.
We appreciate that your organisation details may not remain the same as when you first registered. If you need to change any information change, please contact us at organisations@yoti.com so we can update it. This ensures that we can verify any changes and keep information aligned.
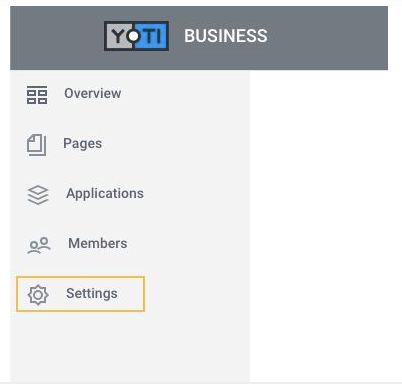
Hub -> Settings
Members and permissions
By default, as the applicant of the organisation, you will have full access to your organisations account.
You will have the ability to add members to your organisation.
To add members, log in to your organisation and:
- Go to the side menu and click Members
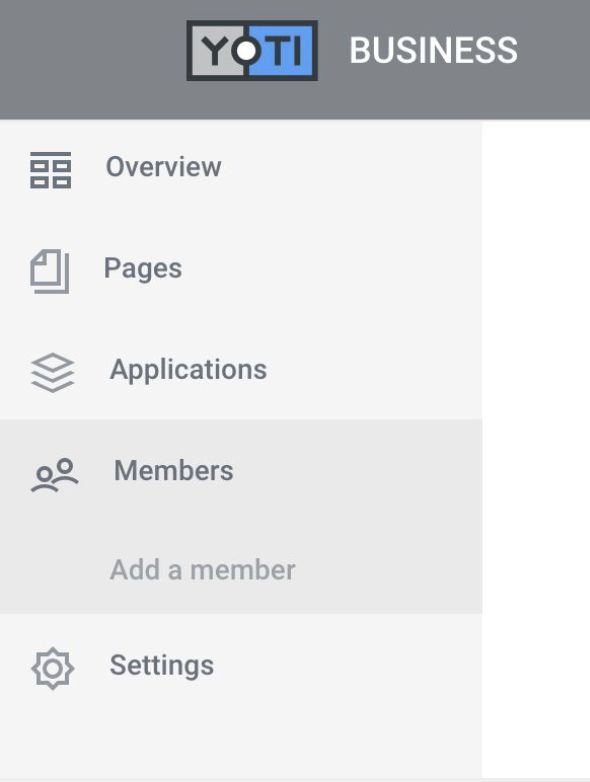
Hub > Members
- Click Add a member and fill in the details - please make sure the email address you use to invite a colleague to your organisation is the same as the email address they have added to their Yoti.
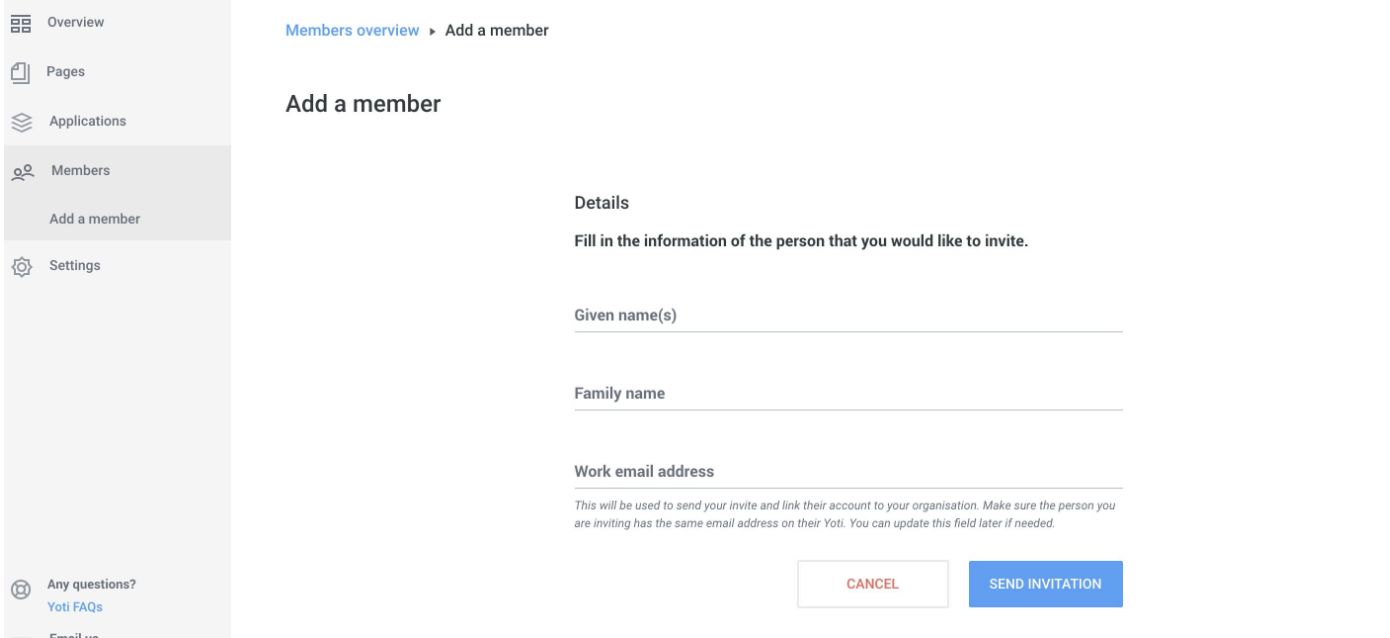
Members > Add a member
Once you have completed this the user will receive an email and will gain access to your Hub account when they scan the QR code sent to them.
Permissions let users perform certain actions within organisations, applications and pages.
Organisation permissions
You need to be an admin to assign organisation permissions to users.
When a user gets invited to an organisation, they don't have any permissions by default. But they can still accept the invitation and access the organisation. An organisation admin is able to give permissions to a user from the Permissions tab on their profile page.
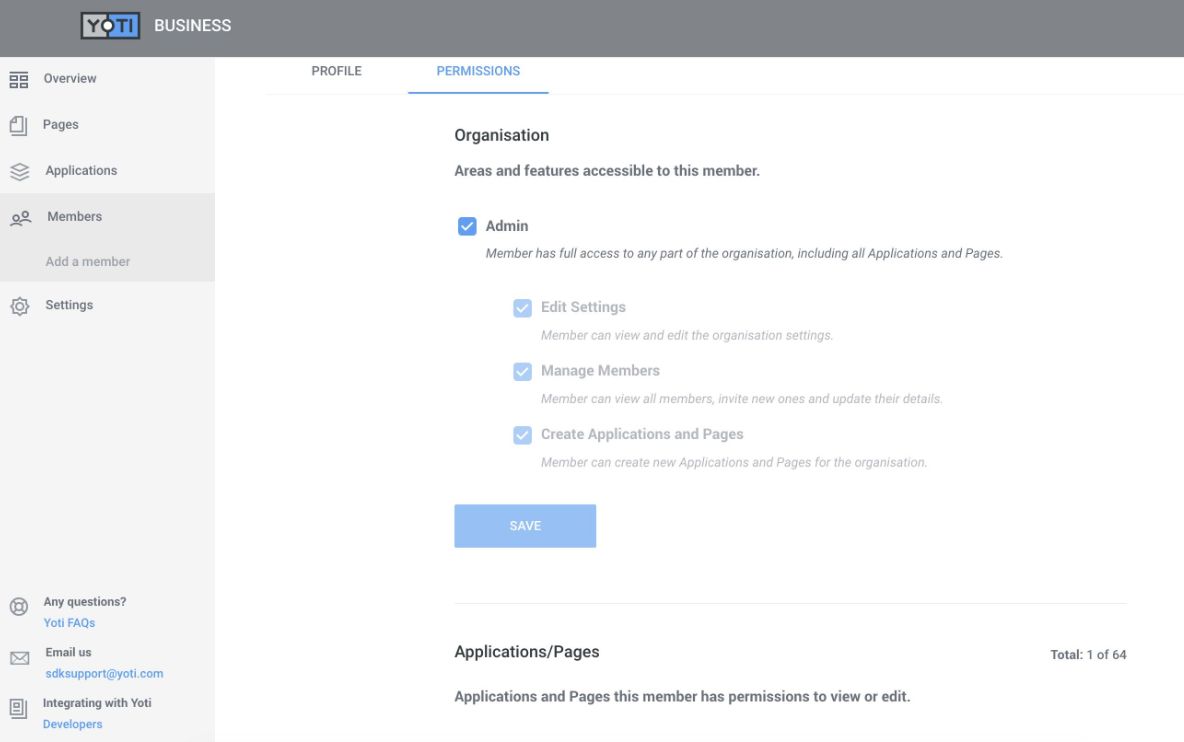
Organisation permissions
| Permission | Description |
|---|---|
| No permissions | Users can view the overview page, the list of the organisation's applications and pages and the list of members. |
| Create Applications and Pages | Users can create applications and pages within the organisation. They will become an admin of those applications and pages. |
| Edit Settings | Users can view the organisation's settings, manage payment cards and add missing organisation details. |
| Manage Members | Users can view and edit member information, invite new users and remove pending users. |
| Admin | Admins inherit all of the permissions above. They can also set and update permissions for users, delete active users and will gain admin access to every application and page within the organisation. |
Application permissions
Once a user is part of an organisation, they can be invited as collaborators for individual applications and pages. An organisation can set collaborator permissions for a user in their profile page, or they can be set in the Collaborator tab within the application or page.
Once a user is added as a collaborator of an application or page they automatically get collaborator permissions.
| Permission | Description |
|---|---|
| No permissions | All members of an organisation can see all applications and pages in the overview page. |
| Collaborator | Users can view the Scenarios and Keys tabs. |
| Access Receipts | Users can view, filter and download receipts. |
| Edit | Users can edit application and page details, create, update and delete scenarios, generate keys and update the states of application and page. |
| Admin | Admins inherit all of the permissions above. They can also add collaborators, set permissions for them and delete applications, pages and receipts. |
Deleting your application
To delete your application go Application > Edit button > press Delete.
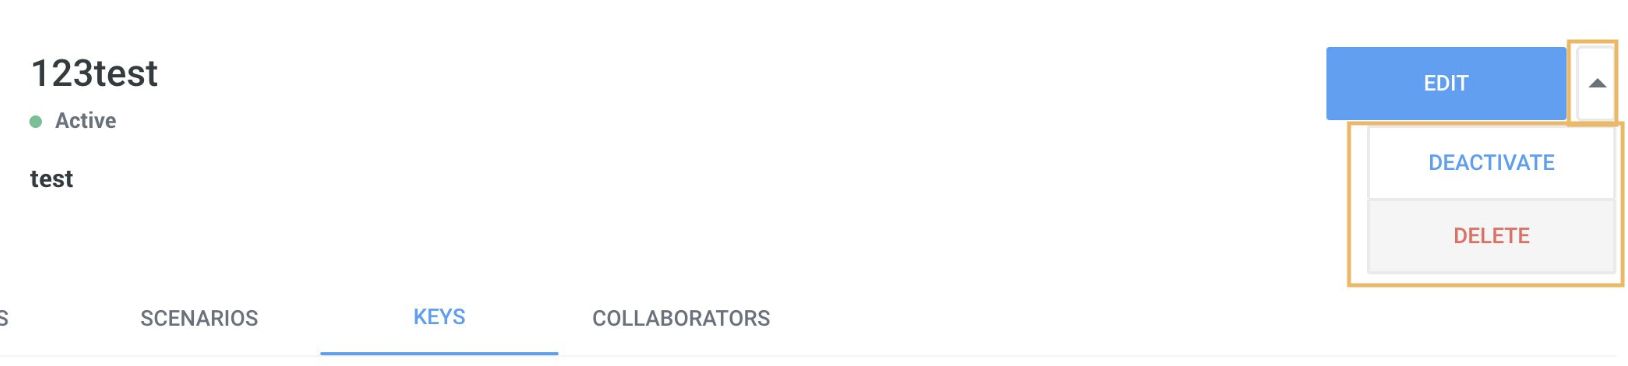
Deleting your application
There is also an option to deactivate your application which will keep an archive of your receipts and integration as a paused state. Users will not be able to scan the QR code on your integration until it gets activated again.
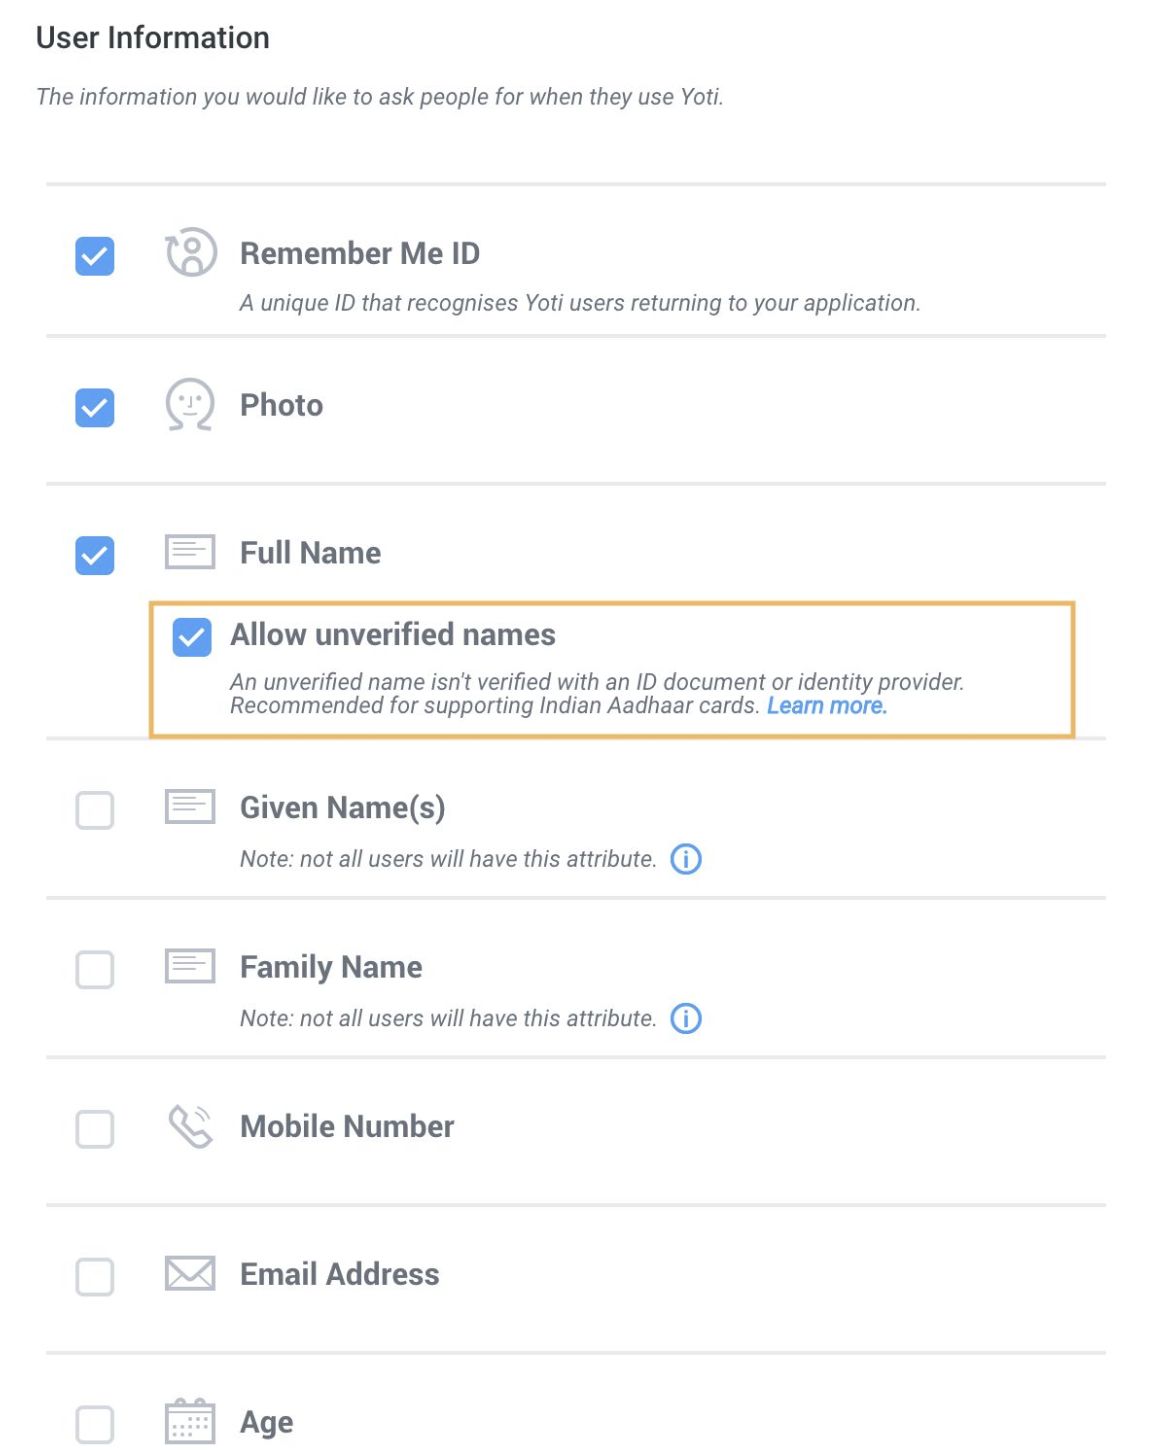
Aadhaar users
If you would like to support customers who have onboarded with Yoti using their Aadhaar card, you will need to make sure that the attributes (where applicable) are set to Allow unverified {attribute name}. As an example, please see a subset of the available attributes below where support for unverified has been selected:
Aadhaar attributes
Attributes supported from the Aadhaar card:
| Attribute | Description |
|---|---|
| full_name | The user's full name. If family_name/given_names are present, this will be equal to the string ${given_names} + " " + ${family_name}. |
| gender | Corresponds to the gender on the registered document; will be one of the strings "MALE", "FEMALE", "TRANSGENDER" or "OTHER". |
| date_of_birth | Date of birth of the user. |
| structured_postal_Address | The structured postal address of user. |